



A running toilet is more than just an annoying sound — it can waste up to 200 gallons of water per day and add hundreds of dollars to your annual water bill. The good news? Most running toilet problems are simple DIY fixes that take 15-30 minutes with basic tools. In this guide, we will walk you through the most common causes of a running toilet and show you exactly how to fix a running toilet step by step.
Whether your toilet won’t stop running after flushing or it cycles on and off by itself (a phenomenon called “phantom flushing”), the fix usually involves one of five components inside your toilet tank. Let’s get started.
Common Causes of a Running Toilet
Before you start making repairs, it helps to understand what is happening inside your toilet tank. When you flush, a chain lifts the flapper to release water into the bowl. Once the tank empties, the flapper seals shut and the fill valve refills the tank. A running toilet happens when something in this cycle malfunctions.
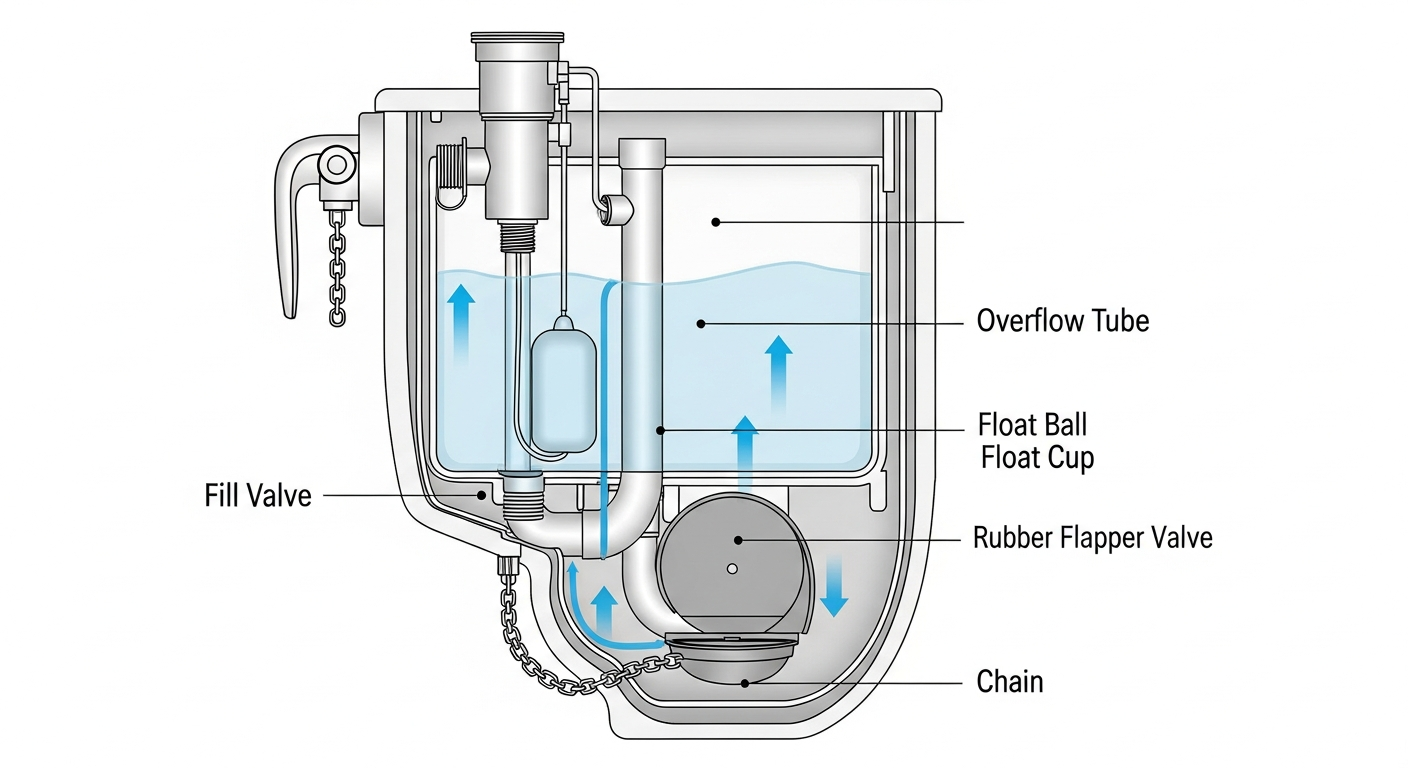
Here are the five most common culprits:
- Worn or warped flapper — The flapper is the rubber seal at the bottom of the tank. Over time, it deteriorates and lets water leak into the bowl.
- Faulty fill valve — The fill valve controls how water enters the tank. A failing fill valve can run continuously or shut off at the wrong level.
- Stuck or misadjusted float — The float tells the fill valve when to stop. If it is set too high, water flows into the overflow tube endlessly.
- Overflow tube issues — If the overflow tube is cracked or too short, water drains into the bowl nonstop.
- Damaged flush valve seal — The flush valve seat can corrode or develop mineral buildup, preventing the flapper from sealing properly.
If you are experiencing other toilet problems beyond running water, our guide on why your toilet is running covers additional diagnostic steps to identify the root cause.
Tools and Materials You Will Need
Before you begin any repairs, gather these supplies:
- Adjustable pliers or channel-lock pliers
- Flathead and Phillips screwdrivers
- Replacement flapper (universal or toilet-specific)
- Replacement fill valve kit (if needed)
- Towels or sponge
- Bucket
- Rubber gloves
All of these items are available at any hardware store for under $20 in most cases.
How to Fix a Running Toilet: Step-by-Step Methods
Method 1: Replace the Flapper
A worn flapper is the number one cause of a running toilet. Here is how to replace it:
- Turn off the water supply — Locate the shut-off valve behind the toilet (usually on the left side near the floor). Turn it clockwise until it stops.
- Flush and drain the tank — Flush the toilet to empty the tank. Use a sponge or towel to soak up any remaining water.
- Remove the old flapper — Unhook the flapper chain from the flush handle lever. Slide the flapper ears off the overflow tube pegs.
- Install the new flapper — Slide the new flapper ears onto the overflow tube pegs. Reattach the chain to the flush handle lever, leaving about half an inch of slack.
- Turn the water back on — Open the shut-off valve and let the tank refill. Check that the flapper seals properly and the toilet stops running.
Pro tip: Take your old flapper to the hardware store to find an exact match. Universal flappers work for most toilets, but brand-specific replacements provide a better seal.
Method 2: Adjust or Replace the Fill Valve
If replacing the flapper did not solve the problem, the fill valve may be the issue.
- Check the fill valve operation — Remove the tank lid and flush the toilet. Watch the fill valve as the tank refills. If it does not shut off or makes a hissing sound, it needs attention.
- Clean the fill valve — Turn off the water. Remove the cap on top of the fill valve (twist counterclockwise). Rinse off any debris and put it back. Turn the water on briefly to flush out sediment.
- Replace if cleaning does not help — Turn off the water and flush the tank. Disconnect the water supply line from the bottom of the fill valve. Unscrew the lock nut under the tank. Remove the old fill valve and install the replacement following the kit instructions.
If you are not comfortable working with water supply connections, that is a good time to call a professional plumber to handle the job safely.
Method 3: Adjust the Float
The float controls the water level in your tank. If it is set too high, water continuously flows into the overflow tube, causing your toilet to run.
- Identify your float type — Older toilets use a ball float on a metal arm. Newer toilets use a cup float that slides along the fill valve body.
- Adjust a ball float — Bend the metal arm downward slightly to lower the float position. The water level should sit about one inch below the top of the overflow tube.
- Adjust a cup float — Locate the adjustment screw or clip on the fill valve. Turn the screw counterclockwise or squeeze the clip to slide the float down.
- Test the adjustment — Flush and let the tank refill. The water should stop at least one inch below the overflow tube opening.
Method 4: Fix the Overflow Tube
If the water level is correct but still drains into the overflow tube, the tube itself may be the problem.
- Inspect the overflow tube — Look for cracks, chips, or signs of wear on the tube.
- Check the tube height — The overflow tube should sit about one inch above the water line. If it is too short, water will constantly flow over it.
- Replace if damaged — A cracked overflow tube requires replacing the entire flush valve assembly. This is a more involved repair. Turn off the water, disconnect the supply line, remove the tank, replace the flush valve, and reinstall.
Replacing a flush valve assembly involves removing the toilet tank from the bowl. If this sounds like more than you want to tackle, our team at 911 Drain Lines and Plumbing can handle it quickly.
Method 5: Clean or Replace the Flush Valve Seal
Mineral deposits and corrosion on the flush valve seat can prevent the flapper from creating a watertight seal.
- Turn off the water and flush — Drain the tank as much as possible.
- Inspect the valve seat — Run your finger around the rim where the flapper sits. Feel for rough spots, mineral buildup, or corrosion.
- Clean the seat — Use fine-grit sandpaper or an emery cloth to smooth out rough areas. Wipe clean with a damp cloth.
- Test the seal — Put the flapper back, turn on the water, and check if the running has stopped.
- Replace if worn — If the valve seat is severely corroded, you may need to replace the entire flush valve assembly (see Method 4).
Quick Troubleshooting Checklist
Not sure which method to try first? Use this checklist to narrow down the cause:
- Water trickles into the bowl constantly — Try Method 1 (replace flapper) first
- Toilet cycles on and off by itself — Usually a flapper issue (Method 1) or flush valve seal (Method 5)
- Hissing sound from the tank — Likely a fill valve problem (Method 2)
- Water level too high in tank — Adjust the float (Method 3)
- Water flows over the overflow tube — Float adjustment (Method 3) or overflow tube fix (Method 4)
For other common plumbing problems you can fix yourself, check out our guides on how to fix a leaky faucet and how to unclog a drain.
When to Call a Professional Plumber
While most running toilet fixes are straightforward, some situations call for professional help:
- Multiple failed repair attempts — If you have tried replacing the flapper, adjusting the float, and checking the fill valve without success, there may be a deeper issue.
- Cracked tank or bowl — A crack in the porcelain requires toilet replacement, not repair.
- Old or corroded internal parts — Toilets over 15-20 years old may have corroded bolts, valves, and fittings that are difficult to remove without breaking.
- Water damage around the base — If you notice water pooling around the base of the toilet, the wax ring seal may have failed. This is a different issue from a running toilet and requires removing the toilet entirely. Learn more about toilet leaking at the base and how to fix it.
- You are not comfortable with the repair — There is no shame in calling a pro. A licensed plumber can diagnose and fix the issue quickly, preventing further water waste and potential damage.
Need professional help? Call 911 Drain Lines and Plumbing at (714) 746-7611 for fast, reliable plumbing service. We serve Orange County and the Inland Empire with 24/7 emergency plumbing, and our licensed technicians can fix any toilet problem the same day.
Frequently Asked Questions
Why does my toilet keep running after I flush?
The most common reason a toilet keeps running after flushing is a worn flapper valve. The flapper is the rubber piece at the bottom of your tank that lifts when you flush and seals to stop water flow. When it warps, cracks, or accumulates mineral deposits, it cannot create a tight seal, and water continuously leaks from the tank into the bowl. Replacing the flapper is an inexpensive fix that takes about 10 minutes.
How much water does a running toilet waste?
A running toilet can waste anywhere from 30 to 200+ gallons of water per day, depending on the severity of the leak. That translates to roughly 1,000-6,000 gallons per month. At average water rates, this could add $50-$200 or more to your monthly water bill. Fixing a running toilet promptly is one of the easiest ways to lower your water usage and save money.
Can a running toilet increase my water bill?
Yes, significantly. Even a slow, silent leak from a faulty flapper can add 30-50 gallons per day to your water consumption. Over a month, that adds up. Many homeowners do not realize their toilet is running until they receive an unusually high water bill. You can test for a silent leak by adding a few drops of food coloring to the tank — if the color appears in the bowl within 15 minutes without flushing, your flapper needs replacing.
Related: Toilet Won’T Flush
How long does it take to fix a running toilet?
Most running toilet repairs take 15-30 minutes for a DIY fix. Replacing a flapper is the quickest repair at about 10 minutes. Adjusting the float takes 5-10 minutes. Replacing a fill valve takes 20-30 minutes. A full flush valve replacement is the most involved repair and can take 45-60 minutes. If you have a stubborn issue that goes beyond these basic fixes, a professional plumber can typically resolve it within an hour. Learn about other common toilet fixes you can do yourself. For expert help, contact our drain cleaning services team.